As I mentioned before, Git is like a security guard. Whenever you hand over your files to him, he will keep it with him. So here we are going to exist a new security guard called Git Repository. I highly recommend you to keep a separate directory to start git repositories.
- To create a new repository, we use $ git init command. For Linux yours, open up a terminal and change directory to your specific location to start the new repository.
You will get a message that Empty Git repository is made for the particular location. Then change directory to your Git folder and type ls. But you cannot see any file inside your repository. OK. now check whether there is a hidden file there. Go ahead and type $ ls -a.
Now you can see that our security guard, Git is inside our repository. This a particular feature of Version Control System.
Note:
If you initiate git on a wrong folder there is way to remove your git folder. If you an Ubuntu user, go to that folder and use shortcut ctrl + H.
Windows users:
Let's move on. Now it is the time to make our first file and add it our Git repository. I will use nano editor to make our new file and do changes to it in later tutorials.
Well.. we will now add this file1 to our repository by typing $ git add command.
You might wonder why do we want to add files to our repository manually. Consider you have a file of sensitive information such as passwords in your directory and you share this repository to a remote git account and it will be a terrible situation for you. By adding a file to Git repository, it will start inspecting your file.
Note:
- If you want to add a particular file to the repository, type $ git add <file_name>
- If there are more than one file you can simply add all of those files to your repository by typing $ git add .
After adding files to the repository, we have to commit this file to our repository so Git can track changes in it.
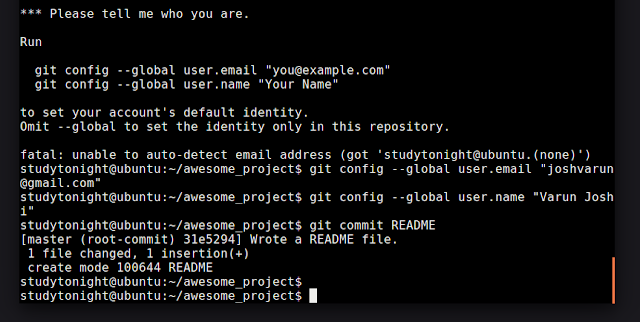
Go on and type $ git commit <file_name>. But Git doesn't really know who you are. So it won't allow you to commit changes.
So go ahead and type below git configuration commands.
$ git -config --global user.name "name"
$ git -config --global user.email "email"
The --global option changes your identity for all your repositories and will be saved with commits. Now you can commit your changes. There is a Good News for you. When you commit changes to your file, you can attach some message that what you have done so far. As an example, we can type something like "My initial commit".
Note:
In the next tutorial, I will discuss how to work with Git status and git rm --cached commands.
Go on and type $ git commit <file_name>. But Git doesn't really know who you are. So it won't allow you to commit changes.
So go ahead and type below git configuration commands.
$ git -config --global user.name "name"
$ git -config --global user.email "email"
The --global option changes your identity for all your repositories and will be saved with commits. Now you can commit your changes. There is a Good News for you. When you commit changes to your file, you can attach some message that what you have done so far. As an example, we can type something like "My initial commit".
Note:
- If you have changed only one file, you can commit by typing $ git commit -m "your message"
- If you have changed more than one file, you can commit all of them by typing $ git commit -a -m "your message". The 'm' option is for providing a message right there in a single command and '-a' option tells Git to 'commit ALL' of the changes.
In the next tutorial, I will discuss how to work with Git status and git rm --cached commands.


Superb..
ReplyDelete