Wednesday, August 23, 2017

Java Programming Interview Questions Series 02 - OOP Concepts


1.      What are the relationships in OOP?                     
                   There two types of relationships in Java.
·  IS-A relationship - Inheritance is an example of IS-A relationship.
·  HAS-A relationship - Aggregation is an example of HAS-A relationship.

2.     What is the difference between StringBuffer and String?
The String is an immutable class. You cannot modify its content once created. If we change the content of the String object, it creates a new string and refers to that new String. But StringBuffer is a mutable class. That means you can change/replace the content later.

3.     Can we use multiple inheritances in Java?
There are 4 types of inheritances that we can find in Java.
1.     Single Inheritance
2.     Multilevel Inheritance
3.     Hierarchical Inheritance
4.     Multiple Inheritance

But Multiple Inheritance is not supported in Java. Because,
·        To remove ambiguity.

·        To provide more maintainable and clear design.

4.     What is the difference between super() and this()?
Basically super() keyword comes from Inheritance. It is used to refer,
·        Immediate parent class constructor,
·        Immediate parent class variable,
·        Immediate parent class method.
   This() keyword is usually used to refer the current object whose method is being invoked. From this() keyword, we can refer any member in the current object.

5.     Can we use both super() and this() in a constructor?
           We can't use. Because both super() and this() must be the first statement inside a constructor. Once we call super() or this() constructor, it doesn’t work as method calling. It just map the super() or this() objects. Therefore we can’t use it.

6.     What is aggregation in java and why we need this?
Aggregation is a special form of association (HAS-A relationship). But it is not the main feature in Java. It has a one-way association. For an example, consider two classes called Student class and Address class, each student must have an address but each address may not have a student and it doesn’t make any sense. That is why it has a one-way association. Below example shows the how aggregation can be used.


You can see that in Student class, Address class is used. From that way, we obtain student address. This relationship is called Aggregation.
To maintain code reusability we need Aggregation. Let’s think that we have two another class of School and staff. In order to maintain all the classes’ addresses, we don’t just have to use the reference of Address class by defining inside each class.

7.     When to use Inheritance and Aggregation?
Using the Aggregation is the better option when you need to use property and behaviour of a class without modifying it inside your class. On the other hand, Inheritance is better to use when you need to use and modify property and behaviour of a class inside your class.

8.     What is Overriding?
Overriding occurs when we use Inheritance. In this feature, that allows the sub class to give a particular implementation of a method. But that method is already provided by one of its super class. If that method in the sub class has the same name, same return type, same signature and same parameters as a method in its super class, at that point the method in the sub class is said to override the method in the super class.

9.     Why Overriding phenomena happen?
If we use a sub class object using sub class reference and invoke a method, the compiler will check the sub class first and if it cannot find such method then it will check the super class.
If we use a sub class object using super class reference and invoke a method, the compiler will check the super class. But if it cannot find such method it will not check in sub class. Because the super class is not extended the sub class. Therefore it will create a compilation error.

10. What is the difference between Overloading and Overriding?

Method Overloading
Method Overriding
1.     The name must be same but parameter must be different.
2.     Increase readability of the code.
3.     Compile time polymorphism.
4.     Access specifier can be changed.
1.     Both name and parameter must be same.
2.     Increase reusability of the code.
3.     Runtime polymorphism.
4.     Access specifier cannot be more restrictive than the original method.


11. Can we override static method?
No, we cannot override static methods. Because static methods exist in the place called Class area.  On the other hand method overriding is associated with the object at runtime and they exist in the place called Heap.

12. What are Upcasting and Downcasting?
When a child class object is referenced by parent class reference variable is called Upcasting.
When a parent class object is referenced by child class reference variable is called Downcasting.

 
Parent p = new Parent();         
Child c = new Child();


Parent p = new Child();  //This is Upcasting.
          Child c = new Parent(); //This is Downcasting. 


But in Downcasting it gives a compilation error saying ‘incompatible type’. Therefore we can cast the Parent object to Student object.
                   Child c = (Child) new Parent();
This will be compiled successfully but throws ‘ClassCastException’ at runtime.

13. Can we override static methods exist in the Super class?
No. We cannot override static methods. Because overriding happens only for the instances that are created temporally when they are invoked. But once we static a method it exists in the Class area and we can directly access it at any time without any object.

14. Why static methods do not need (but can access) any object of a class?
Because all the static variables and static methods exist in the place ‘Class Area’. Therefore without any instance of a class, we can access any method or variable which are static.

15. Why a final class cannot be inherited but a final method can be inherited?
‘Final’ keyword has a different meaning when it uses for classes, methods and variables.
     a.  A final class cannot be extended.
     b. A final method cannot be overridden.
     c.  A final variable cannot be assigned after it has been initialized.   

That is because the language designers chose to design the language in that way.


Monday, August 21, 2017

Java Programming Interview Questions Series 01 - OOP Concepts


1. What are the main features in OOP?
               There are four main features in OOP. 
                            1. Inheritance
                            2. Polymorphism
                            3. Encapsulation
                            4. Abstraction
                As an Object-Oriented language, Java supports all the above features. 

2. What is the difference between parameter and argument?
               A Parameter is a variable which is defined by a method. It has no value in it but it will receive a value when the method is called.
                  An Argument is a value that is passed to the method when it is called.


3. What are the two methods to pass an argument to a method?
                1. Call-by-value: A copy of an argument value is passed to the method. Therefore modification of that argument value will not affect the original argument value.
                2. Call-by-reference: Reference to the argument is passed to the method. Therefore modification will affect the argument value.

4. What is method overloading?
                If two or more methods in a class having the same name but different parameters, it is called as method overloading. There are two types of overloading.
                              1. Method overloading by changing the data type of the argument
                              2. Method overloading by changing number of argument.

5. What is meant by default constructor?
               A constructor is a special method in a class that is used to initialize an object. Every class has a constructor. If we don't declare a constructor for a class, the compiler will create a default constructor for that class but it has no arguments. The default constructor has no meaningful implementation in it. 

6. Can we overload constructors?
             Yes. Constructors are also working as a normal method. To construct objects in different ways, we can overload constructors. 

7. What is the difference between constructor and a normal method?
               Constructors have special attributes rather than normal method. 
                              - Constructors must have the same name as the class.
                              - Constructors return the current state of a class. But constructor signature does not have any return type. 
                              - Constructors in java cannot be abstract, synchronized or static.
                              - They are only called once for an object.
               A normal method can be called many times and can be static, final, abstract. And it can return a value or can be void. 

8. What is meant by garbage collection?
               Normally the object will be destroyed automatically from the memory by the JVM. If there is no reference to an object, then it is assumed that the particular object is no longer needed and the memory will release the occupied memory. That technique is called Garbage Collection.

9. What are the advantages of Garbage collection?
           The programmer does not need to dereferencing an object. Because JVM does it automatically. Therefore memory efficiency will increase and decrease the chance to a memory leak.

10. What are Access Control Modifiers and Non-Access Modifiers?
             Basically, modifiers are keywords, that are used to change the meaning of a definition.
                              1. Access Control Modifiers
                                   Private    : Visible to the class only.
                                   Protected : Visible to the package and all subclasses.
                                   Default    : Visible to the package only.
                                   Public      : Visible to the world.
                          2. Non-Access Modifiers
                                   Static Used in classes and methods which can be accessed without an instance of a class.
                                   Final : Act as constant. Then, class, method or variable cannot be changed.
                                   Synchronized : Used in Threads. Then only one thread can be accessed to that method at a given point in time.
                                   Volatile : Used in Threads. It tells the compiler that the particular volatile variable can be changed unexpectedly in other segments of the program.
                                   Transient : Used in instance variables. Then it's value doesn't persist when an object is serialized.
                                   Abstract : Used to create abstract classes and methods.

11. Why constructors cannot be static?
               The need of a constructor is to initialize the contents of an instance of the class. But static methods do not have an instance. They stay in the place called class area. Therefore they can be executed without an instance. Therefore static constructor does not make any sense.

12. Why the Main method is static?
               Static classes and methods can be accessed without an instance of a class. The entry point of any Java program is the Main method. Therefore it is declared as static because it is called before any object of the class is created.

13. What is static initialization block?
              This is used to initialize static data member. Static block executes before the Main method. Static initialization block can be viewed as 'static constructor.'

14. What is static variable and instance variable?
              Static variables are defined as a class member and they can be accessed without any object of that class (Like static methods) and they can be accessed using its class name. They have only one single storage.
             Instance variables are initialized when an object of the class is initialized. And they can be accessed using the name of the object. Instance variables get new memory each time a new object is created. 

15. Why a non-static variable cannot be referenced from a static context?
              Non-static variables are created when an instance of the particular class is created. It has no particular storage in memory like static variables. Therefore if you try to access a non-static variable without any instance, the compiler will complain because the particular variable is not created yet.


Friday, July 28, 2017

Git for Beginners - Part 8 - Remote Repositories


So far we have discussed how to work with your own repository, which is located locally. There is no conflict if you are the only one who is doing a project. But if you are working on a group project and you need to keep track of the changes of the project which are done by your group members (Consider a large project and share the specification of the project among them). But practically they can't work in your local repository. For that kind of situation, remote repositories are really helpful to you. 

Github, Bitbucket is examples of remote repositories. The basic idea is, they keep your project source code and the group members can get a copy of your project to their own profile and download into their local machines. If one of your group members do some changes to their downloaded source code, they can upload it to their own copy of the project to the remote repository (forked repository) and can make a pull request. So other group members also can see what you have changed. But this is a series of processes. We will discuss in this tutorial how to work with remote repositories.

First of all, you need to create a new account in GitHub, BitBucket or etc. Here I will create a GitHub account. To do this go to this link. GitHub will provide you only unlimited public repositories. But from BitBucket you can use private repositories with some limitations. Once you created an account you can follow the below steps.

There are two ways to work with a remote repository.

          1. Contribute to a project that is started by someone
          2. Create your own project and let others contribute to it.

In this tutorial, we will discuss the first method.

             The best example of this category is, contributing to an Open Source Project. To do this follow the steps given below.

1. First, choose an Open Source Project which will fit with your skills and abilities. As an example, if you are good in Java, you can search 'Java projects' in the search bar or select a project from GSoC Organizations page.

2. Once you have selected a project, go to their main page. In the upper right corner of the page, you will see option buttons.

      1. Watch:  If you watch the repository, you will get all the notifications for any pull requests and issues of that project (even if you are not mentioned). If not, only mentioned notifications will arrive for you.
       2. Start: Starting the repository allows you to keep track of that project even if you are not involved with that project.
       3. Fork:  Once you fork the repository, it will create a copy of a repository and save it in your profile.


Forking a repository is the key thing in this tutorial. Because this will allow you to change whatever you want without affecting the original repository. As an example, if you fix a bug in that project, you can request from the owner of the repository to apply your change. If the project owner likes it, they will add your own feature into their original repository.

3. Now you have the project you like most. But still, you cannot experiment with it. To do that you need another copy of the project onto your local machine. So go ahead and navigate to your fork (in your GitHub profile) of the repository.

      Under the repository name, click Clone or Download.

     If you want to Clone the project, click on the clipboard icon to copy the clone URL for the repository.

          Then open up your terminal and type $git clone https://github.com/YOUR-USERNAME/Project Name and press Enter. Then your local clone of the project will be created.


4. Now you have the project on your local machine! But you, are not the only one who contributes to that project. The changes to the project will happen at any time. Therefore you need to keep your fork and local clone up-to-date. To do this you have to sync your both copies with the original project.

    1. First, go inside your local project directory and type $git remote -v and press Enter and you will notice the current configured remote repository for your fork. It will be considered as the origin.


   2. Then go to the location of the original project repository on GitHub. There you will see the Clone or Download button. Click it and copy the URL. Then open up your terminal and type $git remote add upstream, and then paste the URL you copied and press Enter. (You can use any name for that. Upstream is the only recommended name)


      3. Now again type $git remote -v to verify the new upstream repository you have specified for your fork. Therefore the origin should be your fork and upstream should be the original repository.


Now you can keep your fork synced with the upstream repository with the below Git commands.

       1. Open up the terminal and change the current working directory to your local project.

    2. Fetch all the branches and their respective commits from the original (upstream) repository by using $git fetch upstream. 


       3. Then change your fork's current branch to the master branch using $git checkout master.  Then all the changes will download to your local repository.


       4. Now you have to merge all the changes from the local repository to your working directory. Go ahead and type $git merge upstream/master. This brings your fork's master branch into sync with the original repository. Note that this will not lose your local changes.


     By doing these steps you can update your local project. When you want to fix some bug, I recommend you create a new branch and do the changes. Therefore you can sync your master branch with the original remote project. After you fix the bug correctly, you can merge it with the master branch. There are several ways to do this and consider that this is only one method that I recommend you.

5. Let's say you fix some bug in the project and you want to say to the project owner that you fix the bug. First of all, you have to push your changes to your fork. To do this use the $git push command.
Before all of these, you have to commit your changes first.


Once you push the changes to your fork, Git will ask for your username and the password of the GitHub account.

Then go to your account in GitHub and you will notice that your push command updated your fork. Now is the time to make a request to the owner of the project about your work. So click on New Pull Request. Then add a relevant title for the Pull Request and leave a comment on what you have done in short. Then click on Create Pull Request. If your work satisfied the owner, he will merge your work to his original project.


---------------------------------------------------------End---------------------------------------------------------


Thursday, July 6, 2017

Creating a student license in Jet Brains


       To get a student license in Jet Brains you must have an email account that must belong to any university and that is approved by Jet Brains. If not you cannot get the student license but you can have a chance by going to this link.

      If you have any such kind of email, you can obtain the chance. First, go to this link and apply for a new account.


The status should be a student. The considered email is approved by the University of Peradeniya, Sri Lanka. Then click on Apply for Free Products. 

You will receive an email of verification.


Then check your email account and you will see that the confirmation email has arrived. Confirm your account and you will be redirected to Jet Brains registration page.


Fill it and submit your details. Then you will direct yo your Jet Brains Account. There are more than 10 ultimate/developer products are available for you. 


But you still don't have the activation code. So go ahead and press "Please review License Agreement" and accept it. Then you will obtain your activation code.


The license is valid for one year. Once you finish installing your IDE, open it. Then you will be asked for a license. Then copy your activation code and paste it to relevant place. Now everything is OK. So use Jet Brains IDEs and have fun!!


Thursday, June 15, 2017

Git for Beginners - Part 7 - Git Merging and Merge Conflicts


In this tutorial, I will cover about Git Merging and Merge Conflicts. In the last tutorial, we learnt about Git branching. Basically, Git merging is the opposite of Git branching, but it has additional features.

Merging combines the changes from both to form the current branch. And also it gathers all the commits you have done for particular branches. You can keep working on merged branches if are not deleted. Because when you merge some branch, it is not deleted.

      Let's consider the merging of two branches, in this case, MyBranch will be merged to the master branch.


you will notice that the file1 is changed because of the merge. When you check the file1 the phrase,  'changed the file1 on MyBranch' can be seen in the master branch although I have done it in MyBranch.


If you check your Git log, all of the commits, done in both the MyBranch and the master branch are now can be seen. Because the commits are also have been merged. 

Merge Conflict:

        Above we have focused on Git Merging and will look in deeper about Merge Conflicts. Generally, merge conflicts happen when you changes the same line or the same area of a file. Most of the Version Control Systems provide the option of merging and leave the responsibility of resolving merge conflicts to the user. Most of the times Git tries to resolve merge conflicts. But it may ask you to resolve the issue when it cannot determine which bunch of code to choose. 

Once there is a merge conflict, you must resolve it manually. Otherwise, you cannot switch to another branch.

Let's consider an example. In this case, I will change the file2 which leads to a merge conflict.

In master branch, 


In MyBranch,


Once you have changed the same file on different branches, remember to commit changes for both branches.

Now try to merge the file on the master branch. But you will notice that auto merging is failed by noticing the merge conflict. The reason is Git cannot resolve what is right in that line. Go ahead and check your file, in this case, file2.


What you can observe is there are <<<<<<<, >>>>>>> and ======= markers. These are called conflict markers. These markers are created by Git. The <<<<<<< and >>>>>>>> signs indicate the conflicted area in yuor code and ======= sign separate the two versions. The HEAD means the latest commit. The bottum version is the other branch.

This is your time to what is correct and what is wrong. Go ahead and remove the unwanted parts of your code and resolve the problem. 

In this case, both chocolate and pizza are awesome ;-). Therefore I will keep both of them. 


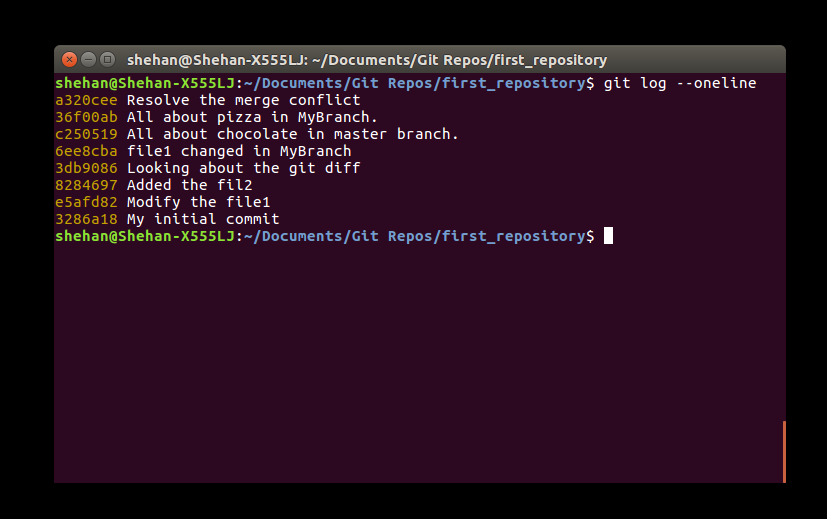
When you check the Git log, you will notice that all commits that you have done are sitting here.


This is somewhat difficult to do it. But now you are ensured by yourself that the final source code is pretty accurate. Once you resolve the merge conflict, go ahead and switch to your branch, in this case, to the MyBranch. (Now you can switch to any branch). You will notice that nothing is changed in file2. Therefore you can continue work on with branch independently.


Wednesday, June 14, 2017

Git for Beginners - Part 6 - Git Branching


In this tutorial, we will focus on Git branching. In one of my previous tutorial, I have said that our default working directory works on the master branch.


Branching is an awesome feature of Version Control System. Consider when you work with a project and if you will face some issues, it is quite easy to fix issues by using Git branches. Another example is when you work on a project and it is going great, but you add a new feature to your project. You don't really want to mess with your current code. What you can do is create a new branch and add the new feature without messing the main source code. 


Branching means, you separate from main line (master branch) of development and continue to do work without disturbing that main line. Most of the Version Control System has branching support. 
You can work with the main line and any number of branches simultaneously. If you have some issue in your project and you don't need to interfere with your project, create a new branch and fix the issue, then add (merge) the fixed issue to your master branch.

Creating a new branch:

        To create a new branch using the $ git branch <branch name> command.


Now you have created a new branch. But you are still in the master branch. Type $ git branch command. 


The ' * ' sign implies the branch you are on. Go ahead and type $ git checkout <branch name>. 


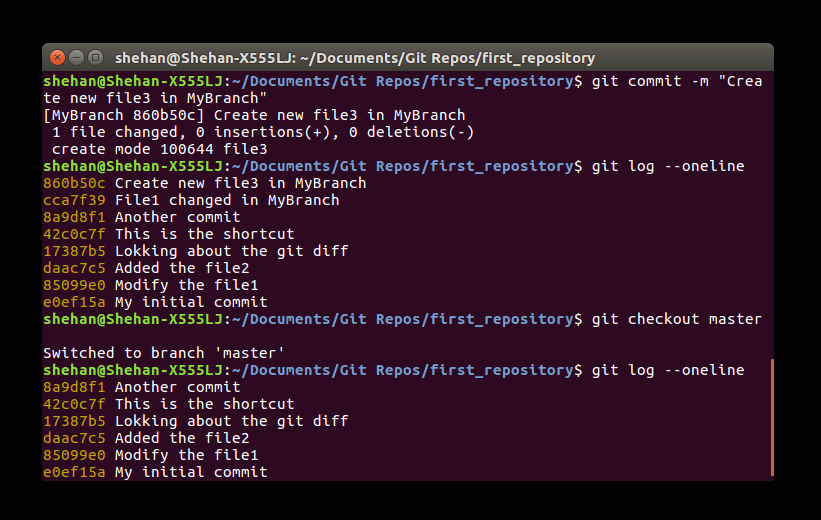
Now you are on your new branch. Let's create a new file (file3) and commit it. After you have successfully committed it check the Git log. You will notice that your latest commit is there.


Let's got the master branch and check the Git log. You will notice that your latest commit is disappeared.


The reason is that commit belongs to your new branch. But when you switch to the master branch it will not appear to you. But the commit is still there.

Let's try another example about branching. First, switch to the new branch and change the content of some file.


Then commit it. When you have committed successfully committed it, switch to the master branch. But the modification of your file is disappeared. This case is also same as the above scenario.

Delete a branch:

        If you want to delete a branch, use $ git branch -D <branch name>. But think twice before you delete a branch. Before you delete the branch you want, switch to the master branch. Because you cannot delete the branch which you are currently on.


If you want to create a branch and switch to it in one command, use $ git branch -b <branch name>. 


Copyright © iTecTricks | Powered By Blogger

Design by Shehan Vanderputt